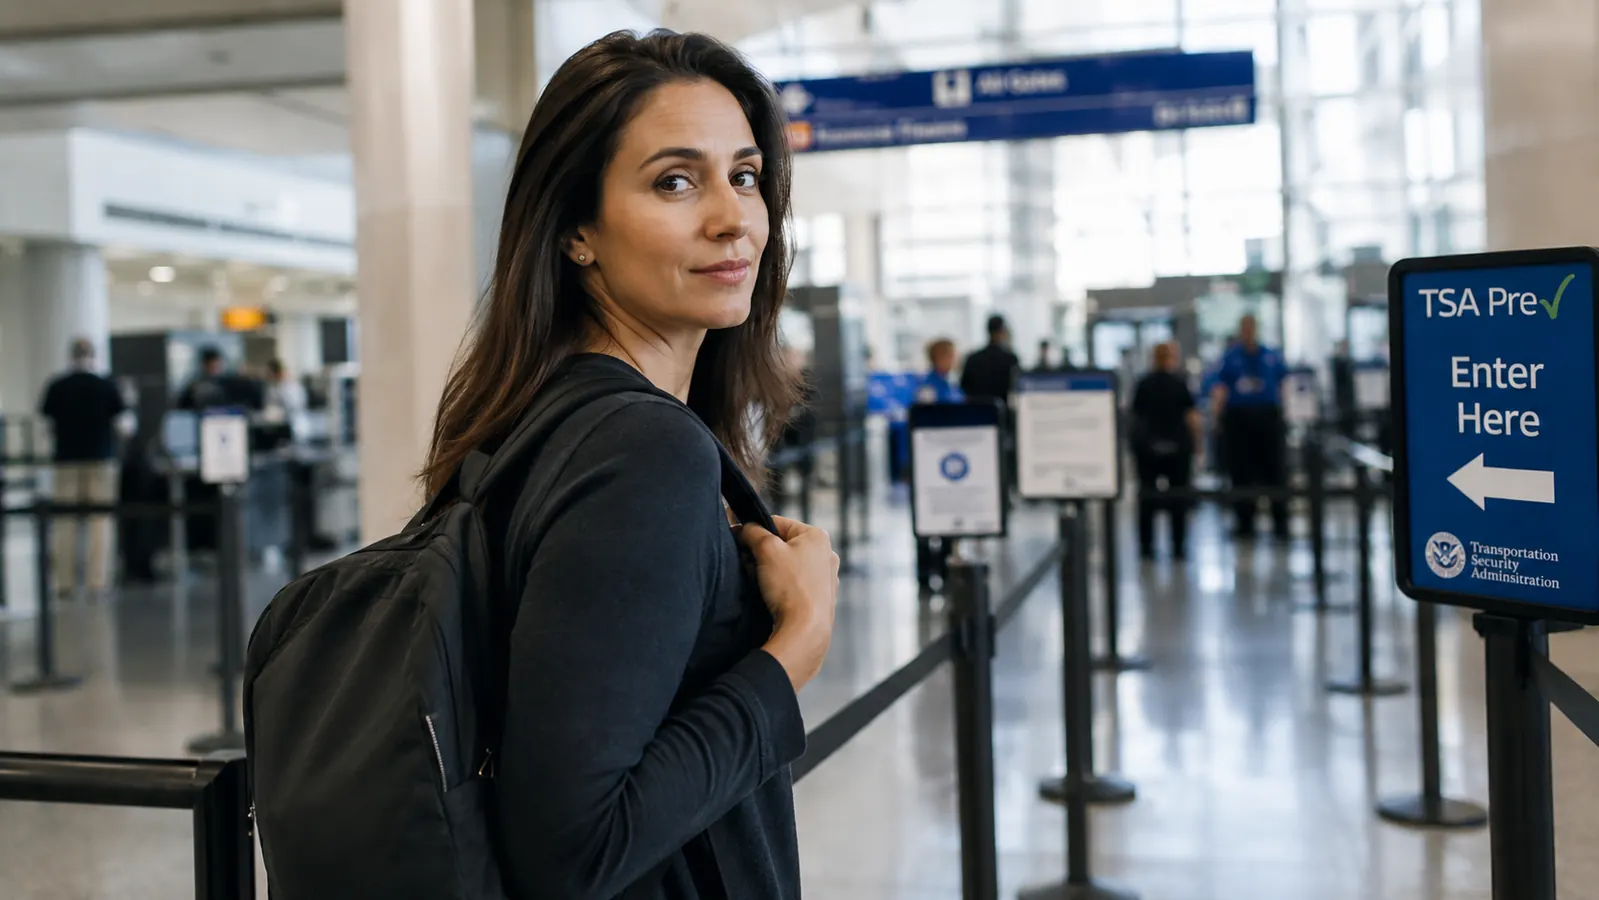
The security line is one of those places where a few small decisions made back at the hotel that morning determine whether you waltz through in 90 seconds or spend eight minutes apologizing to strangers while you dig out your laptop, pull a quart bag from the bottom of your bag, and chase a boarding pass that fluttered into the bin. I have been carry-on-only for seven years, and I have watched both outcomes play out hundreds of times. The difference almost always comes down to two things: the bag you are carrying and how you packed it that morning. The MATEIN anti-theft travel backpack, with its 17-inch laptop sleeve, hidden rear zippers, and deliberately organized compartment layout, is one of the few bags I have used that is genuinely built around the TSA checkpoint experience. But the bag alone does not save you time. This guide walks through every step.
Whether you are heading through a domestic hub on a Monday morning or navigating an international terminal for the first time, the principles here are the same. Get the packing order right, build a few habits before you leave for the airport, and the checkpoint becomes something you actually stop dreading.
The backpack this guide is built around: MATEIN 17-inch anti-theft, rated 4.7 stars by over 113,000 travelers
Before we get into the steps, here is the bag at the center of this guide. The MATEIN anti-theft backpack has a dedicated laptop sleeve, USB charging port, hidden rear zipper panel, and a layout that maps almost exactly to TSA checkpoint flow. Check today's price on Amazon.
Amazon Check Today's Price on Amazon →Why Anti-Theft Backpacks Are Accidentally TSA-Friendly
Anti-theft backpacks are designed to stop opportunistic thieves: zippers hidden against your back, RFID-blocking pockets, cut-resistant panels, lockable compartments. What the designers discovered, maybe unintentionally, is that these same features align almost perfectly with what TSA wants. The dedicated laptop sleeve drops right into the back panel, away from everything else, so removing it takes three seconds. The main compartment zips from the top in a single smooth pull. The quart-bag pocket, if you pack it right, sits on top of everything else and lifts out without disturbing anything below it.
The MATEIN backpack takes this a step further with a luggage pass-through strap on the back, which means you can slide it onto rolling carry-on handles at the gate, then peel it off clean at the bin without wrestling with tangled straps. Small detail. Big difference when you are in a hurry.
Step 1: Assign Every Item a Zone Before You Leave the Hotel
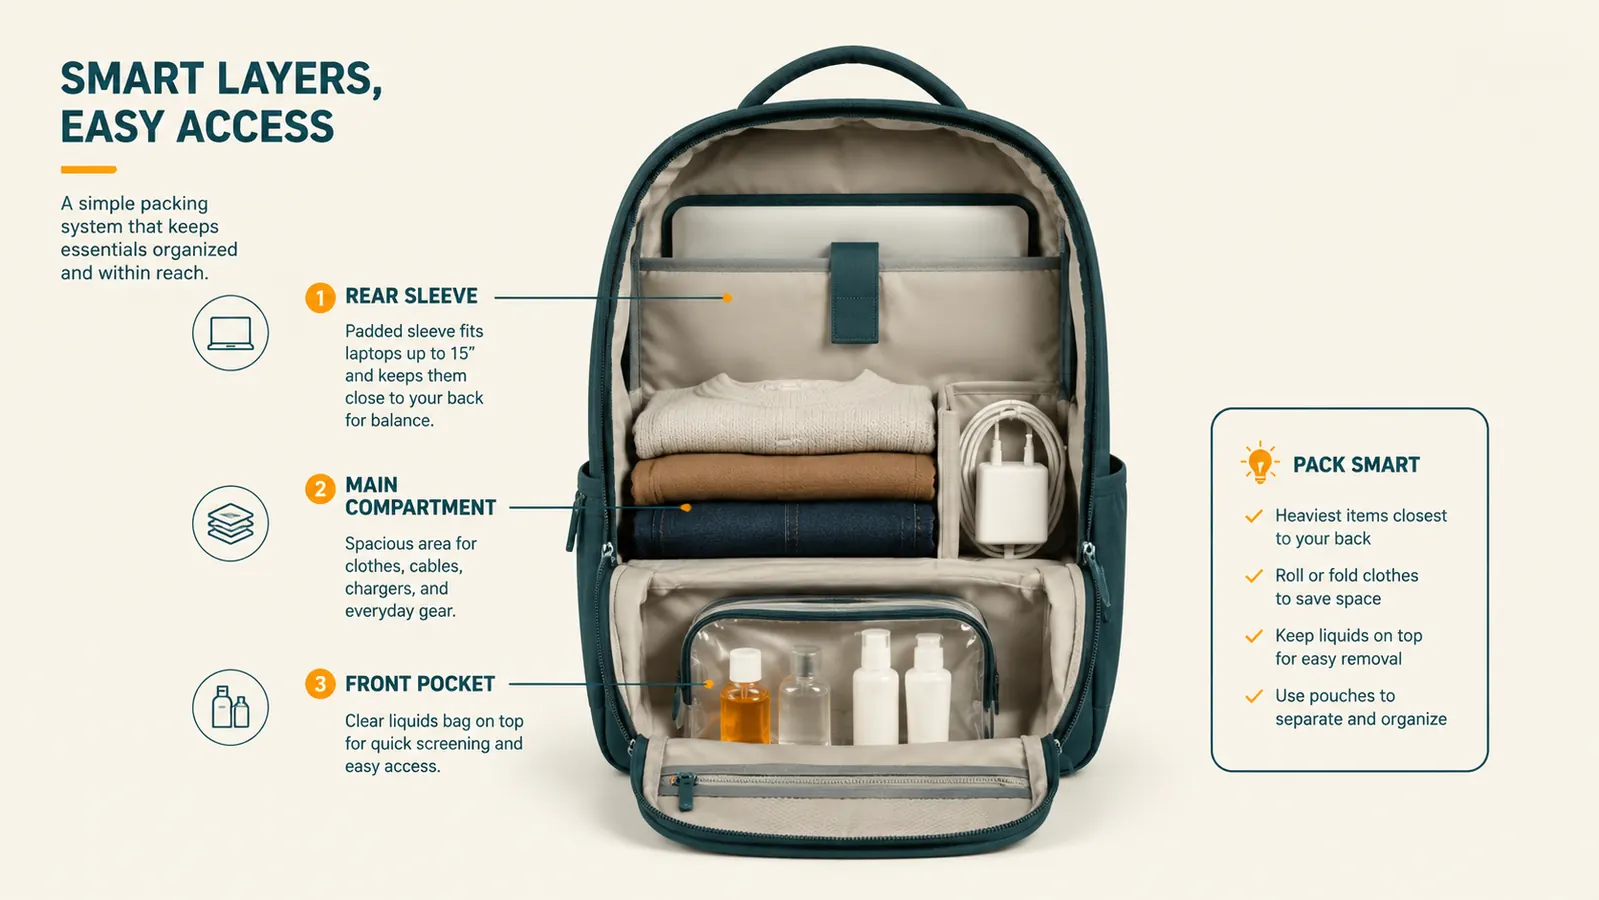
The fastest checkpoint experience starts the night before. Go through your bag and give every item a fixed zone: laptop in the rear sleeve only, quart-sized liquids bag in the top of the main compartment, shoes in the outer pocket or at the very bottom, electronics cables in the front organizer pocket. Do this once and repeat it every trip. When everything has a home, you stop second-guessing yourself at the bin, and you never need to unpack to find something.
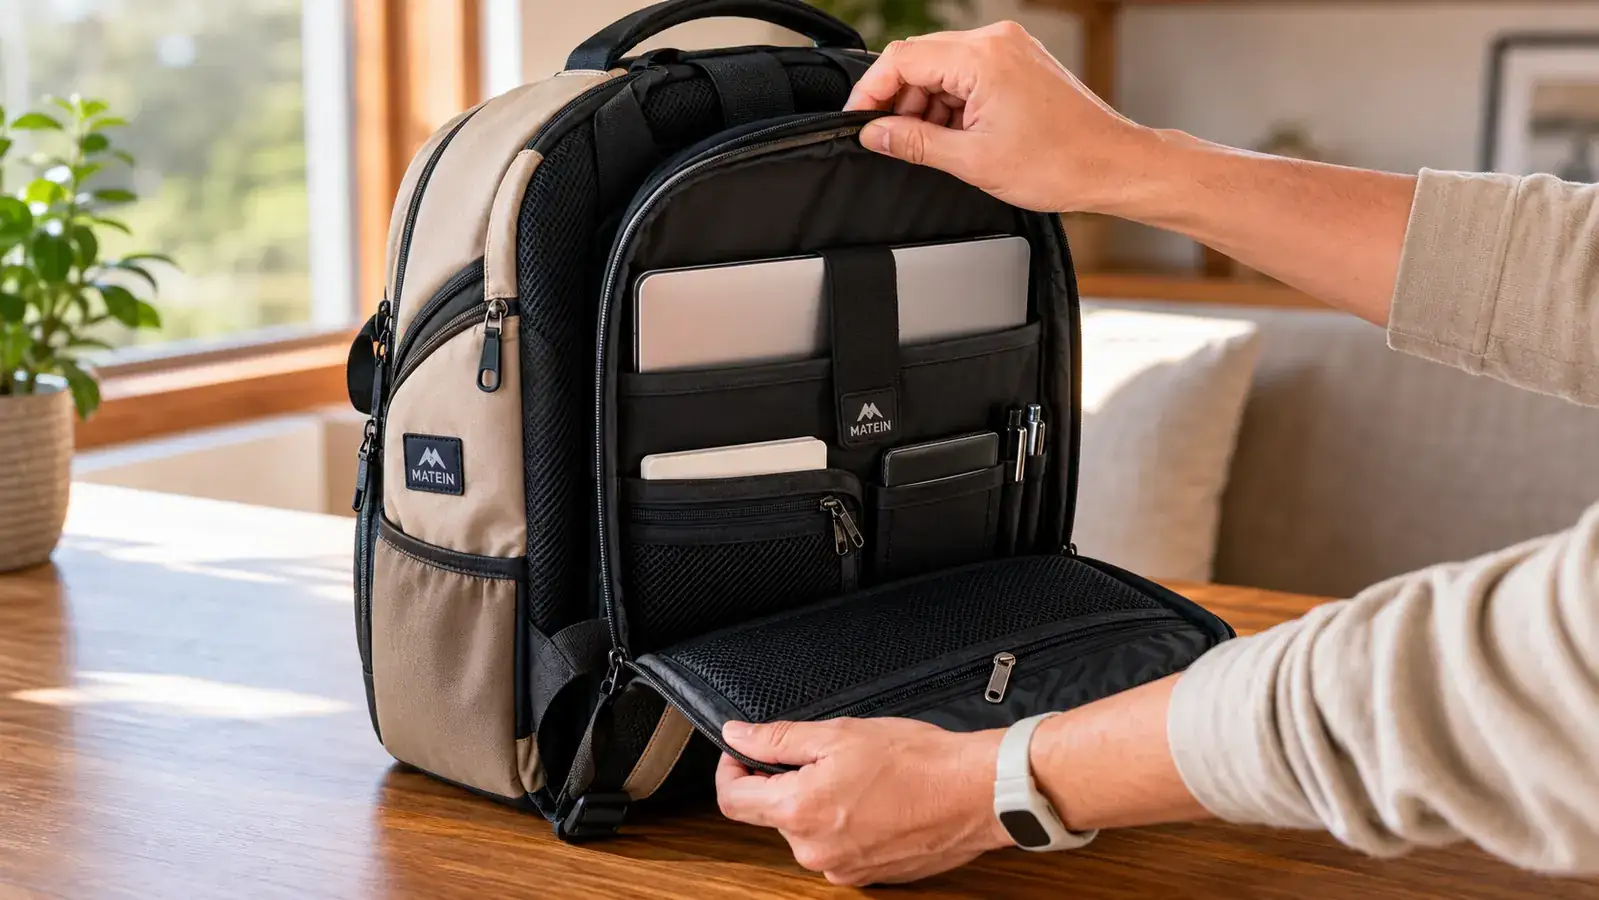
On the MATEIN specifically, the rear anti-theft compartment zips from the bottom edge and opens flat. Your 15 or 17-inch laptop slides straight in with no folding. That rear compartment is the one zone that should have only your laptop in it, nothing else. The moment you add a charger or a book to that pocket, you are adding friction at the checkpoint.
Most people treat packing as a one-time task at the start of a trip. The better habit is to pack to the same map every time you leave a hotel, every morning of a multi-city trip. Zone discipline is what turns a five-minute security scramble into a 90-second walk-through.
Step 2: Position Your Quart Bag on Top of Everything Else
The 3-1-1 liquids rule is the single biggest source of security line slowdowns. Most people bury their quart bag somewhere in the middle of the main compartment and then have to pull out half the bag to get to it. The fix is dead simple: the quart bag goes in last, right on top of everything else in the main compartment. When the TSA officer asks you to pull it out, it is two seconds and a one-finger reach.
Some travelers put their liquids bag in a dedicated outer pocket instead. This works too, but I prefer the main compartment method because it keeps the front organizer pockets clean for electronics, pens, and boarding passes. What you want to avoid is a bag where the liquids bag is structurally trapped below clothes or packed gear.
On the MATEIN, the main compartment is wide enough to lay the quart bag flat on top of your packing cube or rolled clothes. It does not slide or shift during the carry. When you open the top at the bin, it is right there. Lift it out, set it in the bin, zip the bag back up. That is the entire interaction.
Step 3: Remove Your Laptop at the Bin in One Clean Motion
Current TSA standard screening requires laptops to be removed from bags and placed in a separate bin. PreCheck exempts you from this, but if you are flying PreCheck, your total checkpoint time is already so short that this guide is mostly gravy. For everyone else, the laptop-out step is where lines stall. People unzip the wrong pocket, try to tilt a bag to reach the sleeve, or have a cord tangled around the laptop that requires a full untangle.
The MATEIN rear sleeve is accessed from the back panel, which means the laptop comes out without opening the main compartment at all. Swing the bag off your shoulder, set it on the table strap-side down, unzip the rear panel from the bottom corner, and the laptop slides straight out. No digging. No tilting. The whole motion takes about four seconds once you have done it twice.
Practice this at home before your first trip with the bag. It sounds trivial, but muscle memory at a busy checkpoint is genuinely valuable. You will not fumble with an unfamiliar zipper while 30 people form a queue behind you.
Step 4: Tuck Your Personal Items Into the RFID Pocket Before the Line
The MATEIN front pocket has an RFID-blocking liner designed to protect your passport and credit cards from electronic skimming. This pocket is also perfectly sized for your boarding pass, passport, and phone, which means you can access all three without opening the main bag. Use this habit: about 10 minutes before you reach the security line, transfer your boarding pass, passport, and a card you might need for a lounge or airport shop into this front pocket. Everything else stays stowed.
At the checkpoint, you scan your boarding pass and hand over your passport without touching the main compartment at all. After screening, you do not have to remember where you put your phone. It is in the same place it always is. Consistency is the whole game at airports.
One more detail here: take off your belt, watch, and jacket before you get to the bin table, not at it. Hand these to a travel partner or drop them straight into your main compartment while you are still a few spots back in line. By the time you reach the bins, you are moving items from bag to bin, not wrestling with personal gear while people wait.
The checkpoint does not reward speed. It rewards preparation. Every second you save at the bin was earned in the hotel room the night before.
Step 5: Repack in the Right Order on the Other Side
Most people shuffle everything back into their bag as fast as possible and then step aside to reorganize. This doubles the effective time at the checkpoint because you do two rounds of handling. The better approach is to be slightly deliberate on the repack side. Laptop goes back in the rear sleeve first. Quart bag goes back on top of whatever is in the main compartment. Boarding pass and passport go back in the front RFID pocket. Belt and watch go into a jacket pocket or the top of the main compartment until you reach your gate.
This takes about 45 seconds and leaves your bag organized for the rest of the day. When you land and head to the hotel, everything is still in its zone. The first habit that breaks down for most travelers is the repack step, because the psychological pressure of moving quickly past the checkpoint makes them rush. Resist it. Those 45 seconds pay dividends for the next 12 hours.

What Else Helps
A good bag solves the structure problem, but a few surrounding habits make the whole system tighter. Wear slip-on shoes when you know you are going through a checkpoint. Keep electronics cables in the front organizer pocket of the MATEIN rather than loose in the main compartment, because loose cables can flag an X-ray and trigger a bag pull. If you carry a portable battery, know your airline and TSA limits before you pack it: anything over 100Wh requires airline permission and goes in carry-on only, not checked. The MATEIN's USB charging port threads through to an internal battery pocket, so your power bank is already in a dedicated, easy-to-locate spot if an agent wants to see it.
Also worth knowing: the anti-theft zipper on the MATEIN rests against your back when worn, which means a bag check officer cannot open it without you removing the bag. This is a security feature but also means you need to be ready to open it yourself if asked for a secondary screen. The rear panel unzips fully flat, which actually makes secondary screening faster than a traditional zipper bag. Agents can see the entire contents without asking you to pull anything else out.
For international travel, a few extra notes. Most international security lines do not require shoes to be removed, but they may require your toiletry bag to be shown separately regardless of the bag you carry. The same top-of-bag habit still applies. Some airports, particularly in the UK and parts of Europe, run stricter secondary checks on electronics. Having your laptop and cables cleanly separated in their own zones makes this smoother. The MATEIN's layout, with its separate laptop sleeve and front electronics organizer, is genuinely well-suited for international terminals where agents are more likely to want to see specific categories of items in isolation.
The Packing Map, Summarized
If you want a single reference you can follow on every trip, here is the zone map that works for the MATEIN and most organized anti-theft backpacks. Rear sleeve: laptop only. Main compartment, top layer: quart-sized liquids bag. Main compartment, below that: packing cube or rolled clothes. Front organizer pocket: cables, earbuds, portable battery. RFID front pocket: passport, boarding pass, card. Outside top handle: nothing that can catch or tangle at the checkpoint.
Follow this map consistently and checkpoint friction drops to near zero. The anti-theft features keep your gear safe while you are in transit. The organized layout keeps the TSA process moving. The two goals are not in conflict, and the MATEIN is one of the few bags at this price point that actually engineered for both at once. At 4.7 stars across more than 113,000 ratings, it is not a hidden find, but it is genuinely worth every one of those ratings for travelers who care about the checkpoint experience as much as the pickpocket problem.
Ready to stop dreading the security line? The MATEIN anti-theft backpack is the bag this system is built around.
Over 113,000 travelers rate it 4.7 stars. Dedicated laptop sleeve, RFID front pocket, hidden rear zipper, and a layout that matches the TSA checkpoint process step for step. Check today's price on Amazon and see if it is still in stock in your size.
Amazon Check Today's Price on Amazon →